Our Water System
DISCLAIMER:
Keep in mind that this information is only intended for study/reference. You should be making all decisions and calculations for your project based on your specific needs. Also, I am not a professional, so don't just take my word for it. Do your own research and use common sense. There’s tons of good (and bad) information out there, so use your best judgement when deciding what’s going to work best for your specific situation. If in doubt, there is nothing wrong with consulting a professional. This is not rocket science, but a system that is designed/installed improperly could potentially lead to a dangerous situation.
Fresh Water System

Fresh Water Holding Tank
We house our fresh water holding tank underneath one of our bench seats at the rear of the van. When we are stationed near one of our families homes, we tend to not think so much about conservation, given that it is quite easy to fill up there anytime. Conversely, on the road, its not as convenient to fill as frequently. Our tank has about a 30 gallon capacity, so it allows us to go at least a few days in between fills, depending on our consumption. The holding tank we purchased has 4 outlets. We use one to fill, one to vent, one as an outlet to the system, and one to drain if needed(winterizing). The gravity-fed fill tube is located inside the bench and has a ball valve to keep water from sloshing out. We keep an expandable garden hose in the van to connect to a water spigot and just let it flow to fill the tank. The vent tube runs up behind the wall a couple feet. This allows the air pressure in the tank to equalize with the outside air as the tank is filled and emptied with water.
Strainer
The first thing that the water passes through as it leaves the holding tank is a strainer. This is a very essential piece of the system as it protects the water pump by keeping any particulate from entering the motor which could cause major issues and potentially destroy the pump.


Water Pump
We chose a Shurflo water pump to pressurize our water system. We have found the 3 gallons/minute model to give us plenty of pressure without being too noisy. Although they offer a seperate silencer kit, the size and placement of this pump allows it to operate fairly quietly in our environment. We also really don’t mind a little pump noise when running the water; it helps us with conscious conservation. Mounting the pump to a solid surface helps keep the vibration/noise to a minimum. We have ours mounted directly to the floor just after the strainer.
Accumulator Tank
We added an accumulator tank directly after our water pump in order to dampen any water pulsation and to help hold the pressure throughout our system more efficiently. Although not always necessary with this water pump, we wanted to install a tankless water heater and read that because it was ‘on-demand’, it had the potential to inhibit the water pressure.


Water Heater
In addition to Courtnie being a wellness blogger and recipe developer, we cook most of the meals we eat. That makes for a lot of dishes. One of the comforts of home that we didn’t want to sacrifice when moving into the van was the ability to run hot water. The hot water really helps cut through grease and caked on foods, and helps keep our water consumption to a minimum. Also, washing your hands and face in the middle of winter is no fun with cold water. We split the plumbing from our water heater to the sink and out the back to our outdoor shower. It has been really nice rinsing our feet off and hosing down the dog with some nice warm water. We decided on a tankless water heater for our build. Not only does this reduce weight, but the water is heated on-demand only when needed, taking just a few seconds to start running hot. This also provides us an endless supply of hot water with no waiting for it to reheat as with conventional tank heaters. This unit also comes with built-in freeze protection. Another major selling point for us was that the vent for the unit is very small and only required us to drill 3.75in hole in the side of our van instead of the large square cutout that is required with most water heaters.

Kitchen Faucet
We love our kitchen faucet! Not only is it a nice accent in our kitchen, it is very functional and adjustable. We tend to run it on spray mode pretty often when washing dishes as it allows you to get more pressure with less water consumption. It swings easily from side to side allowing a better use of space in the sink and is helpful when washing your face. The head is very ergonomic as you can remove it from the holder and pull it down to reach inside dishes and around the edges of the sink for easy cleaning.

Kitchen Sink
When designing our kitchen, we went back and forth on a lot of different sink options. We wanted to save space underneath to house the water heater and to allow a little room for storage. We also wanted to keep it small enough to save some counter space. In the end, we decided on a mini farmhouse style sink. The sink we chose is actually an above-counter bathroom sink. We built the cabinet to inset the sink and to hold it flush with the bottom of the countertop. We also mounted it so that it sat about 2 inches out from the face of the cabinet. When we made the cutout on the countertop for the sink, we cut it to hang just over the edges. We wish we could have found a deeper sink with the same cutout dimension, but the fact that it sits below the counter gives us a bit more depth. Overall we are pretty happy with it. Its a nice design thats compact and helps our van feel more like a home.

Berkey Water Filter
We usually drink a lot of water throughout the day, and aside from filtering our water to drink, we also use it to cook with and to brush our teeth and wash our faces with. We have found the Big Berkey model has been a great fit for us. It has the ability to filter 2.25 gallons at at time which allows us to run through and refill the system once a day. We just fill it up at night so we don’t have to worry about running out during the day. The unit sits atop our counter allowing the spigot to hang just over the edge of our sink. The placement was actually unplanned, but it fits perfectly tucked up against the van wall and our faucet. We installed a heavy gauge eyelet screw to the wall that we used to run a nylon strap around the Berkey to keep it secure!
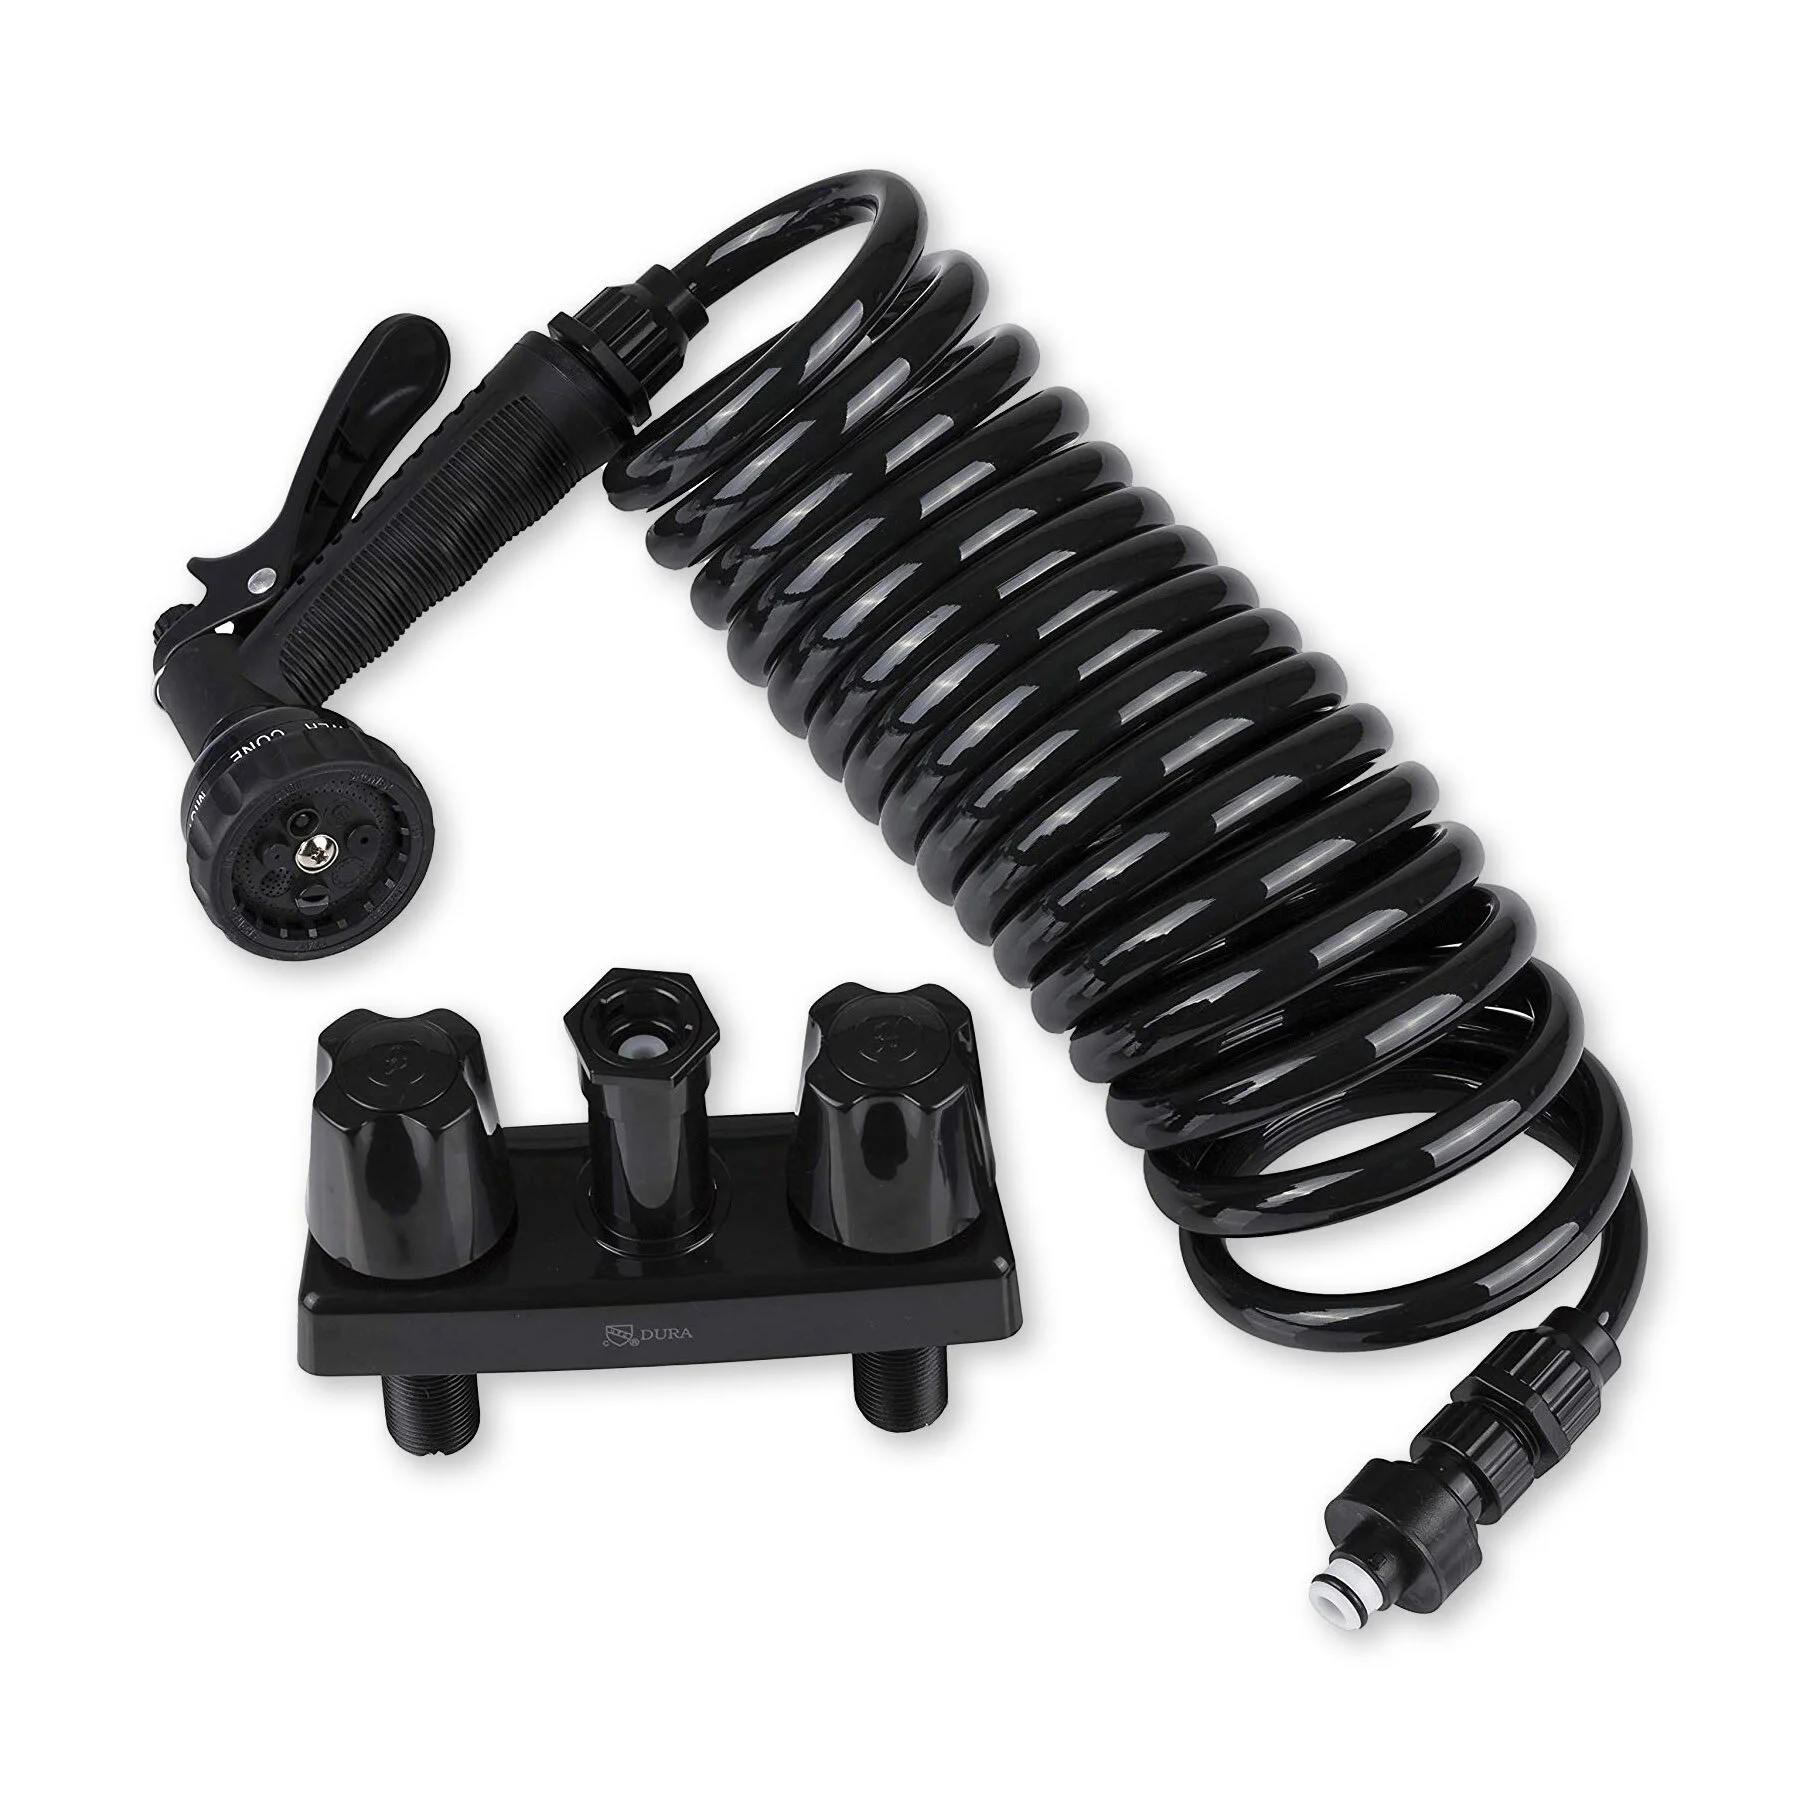
Shower Fixture
We initially wanted a shower in our van, especially since we live in it. However we wanted to keep an open flow with the design and not feel too crammed, so we decided against a wet room. With our situation, finding a shower has been fairly easy. We have a Infrared Sauna membership which allows us the use of the gym’s shower. Courtnie also teaches at an awesome yoga studio in Orange County, so we both get to enjoy a free membership. They have nice showers at both locations, so its a perfect setup for us. Without an indoor shower setup in our van, we still wanted a way to rinse. We found a great exterior shower faucet that we were able to install behind our bench seats, just inside the back door. It’s made with a quick-disconnect hose so we are able to take it on and off for easy storage.
Drain System
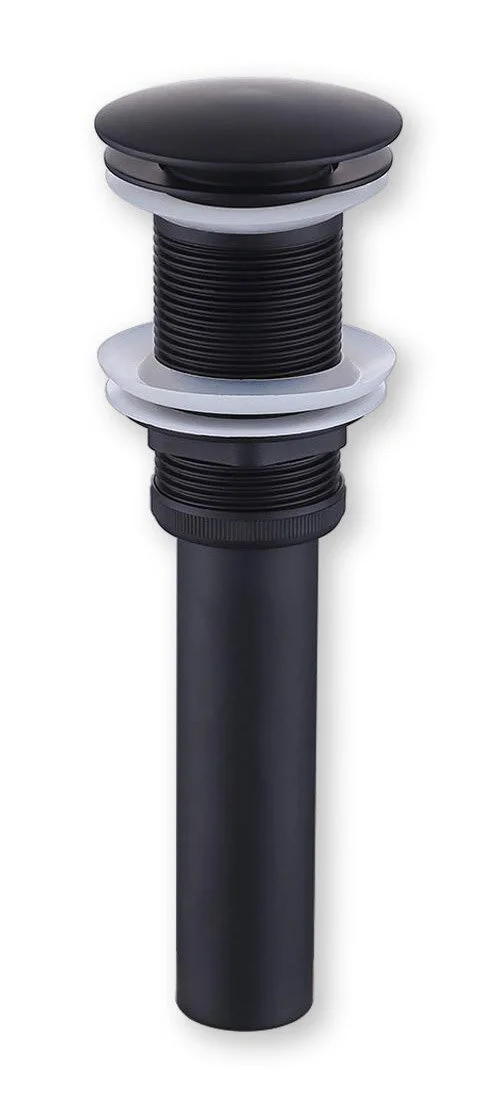
Sink Drain
We installed a bathroom sink drain to match our sink which has a 1-1/4 inch opening. We went with black to match our faucet and it fits nicely with the sink. We have black cabinet hardware as well as the stove grate, faucet, drain and a few other small accents to contrast the white paint and natural wood tones we have running throughout the van. The drain is easy to open and close to collect water by simply pressing it down.

Drain Trap
We installed the HepvO trap in place of a traditional p-trap.
HepvO is a unique self-sealing waste valve that prevents the escape of foul sewer air from waste discharge systems, and actively maintains the pressure equilibrium in soil and waste installations. As a dry sealing valve, HepvO utilizes a purpose designed membrane to create an airtight seal between the living space and the drainage system. The self-sealing valve opens under the water pressure of a fixture emptying, and closes to form a tight seal after the fixture has discharged under normal atmospheric conditions.
Can be installed vertically or horizontally making it a great space saver, especially when used as a shower drain.
Copes very well with food waste includes fats, and solid food particles.
Improves venting to negative pressure of the waste system, eliminating the need for an air admittance valve
Not affected by siphonage: no foul odors, gurgling noise, easy flow
Gray Water Tank
Our sink in plumbed directly through the floor of our van and drains to a 21 gallon gray water holding tank that we mounted under the van chassis. Mounting the tank was one of the last things we did before heading out on our first big road trip. This was something that we had put off since the beginning. It was for good reason, because that sucker was pretty tough to get up under there. Although we wanted a more bulletproof design, we hadn’t planned out what exactly what we wanted yet, and we needed to hit the road to make it to a wedding at the start of our trip. We ended up screwing some pipe strap to the chassis and wrapped it around to cradle the tank one across the length of it, and two side to side. We used a floor jack to lift the tank in place as we mounted it which was very helpful, but it was tough to get up above the tank in the tight spaces to screw the strapping in. We would recommend a riveting tool to connect the straps at the bottom after hanging the tank instead. We plan to build a more heavy duty support system in the near future and will post the plans here.
Tank Drains
We installed a 3inch Gate Valve to drain the tank. The large opening makes for a quick and easy evacuation, but getting under the van and opening the valve to drain every time can be a bit of a pain. We recently purchased a motorized ball valve to drain the tank as well, and although it has a much smaller opening and will take longer to drain, it seems much more convenient. We plan to wire the valve to the vehicle at the auxiliary power port located inside the bulkhead by the sliding door. This is connected to the van battery and is operated by a switch on the console by the steering wheel. We will also post the plans for that once we have it installed.